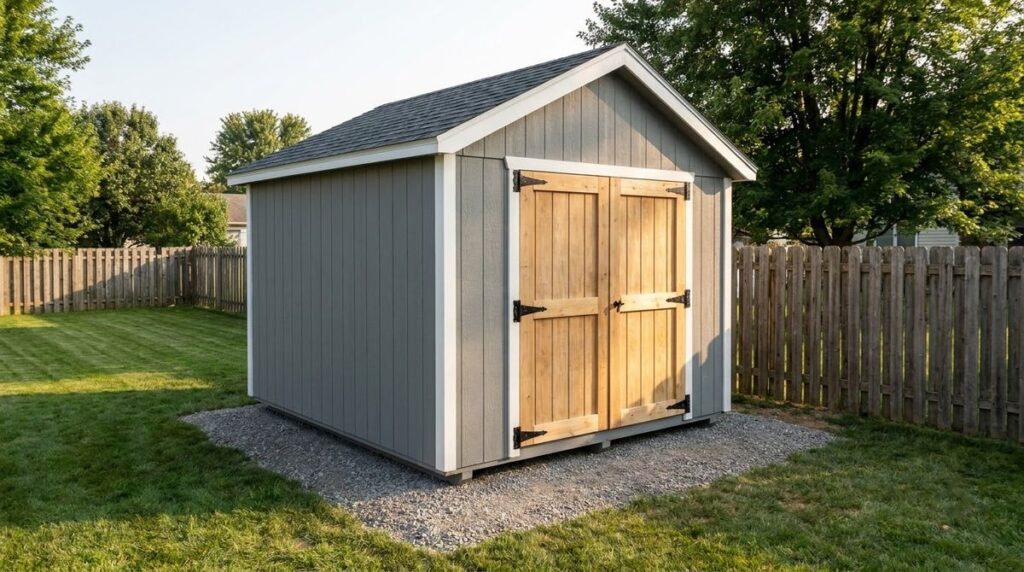
To build a storage shed, you set a level foundation, frame a floor of treated joists, stand 2×4 stud walls, frame the roof, sheathe and shingle it, then hang the door; under the 2021 IRC, a one-story detached shed of 200 square feet or less needs no building permit. Your city can still require a zoning permit, setbacks or anchoring.
Key takeaways
- The model code line is 200 square feet. IRC R105.2 exempts one-story detached accessory structures up to that size from a building permit, but not from the code itself or local zoning.
- Cities draw their own lines. Middletown, RI wants a building permit above 64 sq ft; Sioux Falls, SD wants a permit for any shed.
- 2×6 floor joists at 16 inches on center span up to 9 ft 4 in in No. 2 Southern pine under the IRC 40 psf floor table.
- Asphalt shingles need a roof pitch of at least 2:12, with double underlayment from 2:12 up to 4:12 (IRC R905.2.2).
- Any wood touching the ground has to be pressure-treated lumber rated for ground contact (IRC R317.1.2).
Here is what a typical wood-framed storage shed takes, with what to choose for each part.
| Item | What to choose | Notes |
|---|---|---|
| Skids or sill | 4×4 or 4×6 pressure-treated, ground-contact rated | Required for wood touching soil (IRC R317.1.2) |
| Floor joists | 2×6 or 2×8 pressure-treated at 16 in on center | Size by span, see the framing table below |
| Subfloor | 19/32–5/8 in rated sheathing at 16 in joists; 23/32–3/4 in at 24 in | Span ratings from IRC Table R503.2.1.1(1) |
| Wall framing | 2×4 studs at 16 or 24 in, double top plate | 2×4 bearing studs allowed at 24 in up to 10 ft tall (IRC R602.3(5)) |
| Rafters | 2×4 or 2×6, ridge board, 2×4 rafter ties | Size by horizontal span and snow load |
| Roof deck | 7/16 in sheathing rated 24/16 | Spans rafters up to 24 in on center |
| Roofing | Drip edge, underlayment, asphalt shingles, roofing nails | Nails at least 12-gauge with 3/8 in heads (IRC R905.2.5) |
| Tools | Circular saw, framing nailer or hammer, drill/driver, 4-ft level, framing square, chalk line, tape, ladder | A miter saw speeds up repeated rafter and stud cuts |
Do you need a permit to build a shed?
Whether you need a permit to build a shed depends on your city, not on the model code alone. The 2021 International Residential Code, Section R105.2, lists work exempt from permits; item 1 covers one-story detached accessory structures, other than storm shelters, with a floor area of no more than 200 square feet (18.58 m²).
The same section adds that a permit exemption does not authorize work that violates the code or any other local law. Zoning still decides where the shed sits, how tall it is and how close it comes to the lot line. Three real examples show how far local rules move from the 200-square-foot line:
- Middletown, Rhode Island: sheds larger than 64 sq ft need a building permit with a site plan. A shed of 150 sq ft or less may sit 5 ft from a rear lot line with a maximum height of 15 ft, never in the front yard or closer than 10 ft to the house.
- Southfield, Michigan: sheds of 200 sq ft or less need a residential zoning permit; larger ones need a building permit. Rear-yard sheds keep a 3-ft minimum setback from side and rear lot lines and stay out of utility easements.
- Sioux Falls, South Dakota: any accessory structure needs a permit. A rear-yard shed more than 10 ft from the house can come within 2 ft of the property line, overhang included, and sheds must be anchored.
Call or visit your building and zoning department with a sketch showing the shed size, height and distances to lot lines and the house before you buy lumber. HOA rules can add another layer.
Choosing the size and the spot
Choosing the size and the spot comes before any framing, because both feed the permit question. A shed just under your local permit threshold keeps paperwork light; an 8×10 (80 sq ft) or 10×12 (120 sq ft) footprint fits under the IRC line with room to spare, while a 12×16 (192 sq ft) sits just below it.
For the site, look for ground that drains away from the shed, room to open the door fully and reach every wall for painting, and distances that clear your local setbacks. Contact 811 a few business days before you dig for piers or a slab; the national before-you-dig service is free.
Shed foundation options at a glance
Shed foundation options fall into four groups, and the right one depends on shed size, soil, frost and local rules. A separate shed foundation guide on this site covers each one in detail; here is the short version:
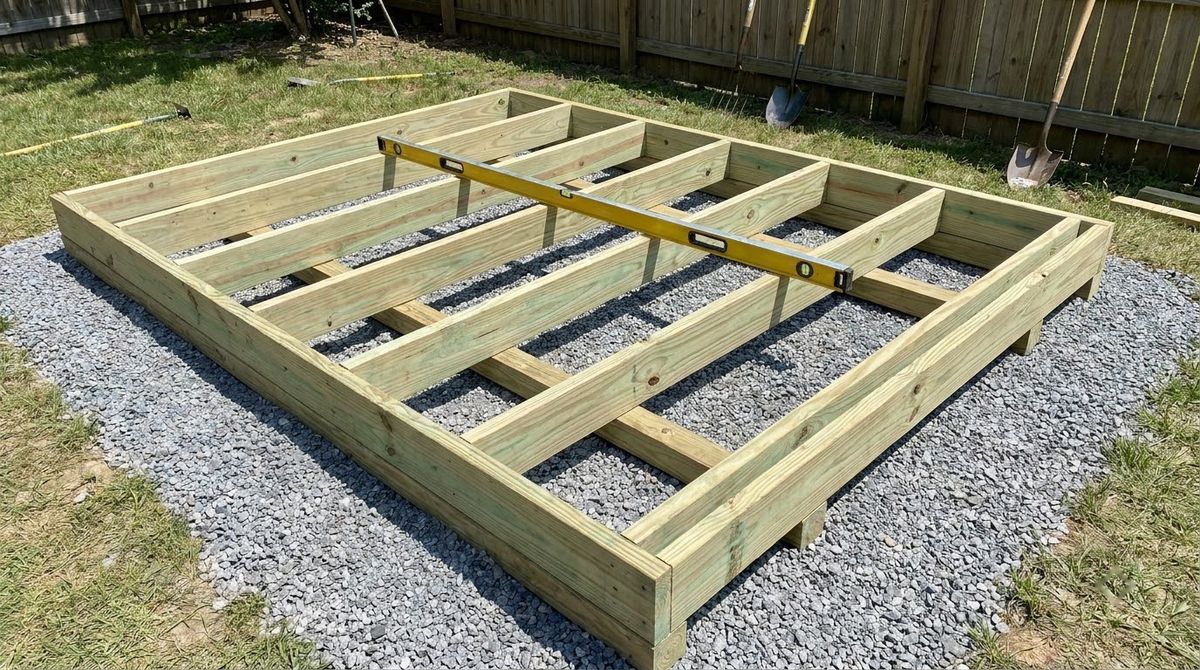
- Gravel pad: a leveled, compacted crushed-stone bed, usually with treated skids on top. It drains well and suits most small sheds.
- Skids on grade: treated 4×4 or 4×6 runners laid on leveled ground or gravel, with the floor framed on top. Simple, and the shed can be moved later.
- Concrete blocks or piers: solid blocks or poured piers under beams. Useful on a gentle slope, where blocks make up the height difference.
- Concrete slab: the most permanent option and the one some cities ask for. Southfield, MI, for example, requires a concrete rodent wall at least 4 in thick, 8 in above and 24 in below grade.
Whatever you pick, IRC R317.1.2 requires wood in contact with the ground to be pressure-treated lumber approved for ground contact. Floor framing closer than 18 inches to exposed ground under a building also has to be treated or naturally durable (R317.1).
Framing sizes for the floor, walls and roof
Framing sizes for a shed come from span tables, not from guesswork. The spans below are from the 2021 IRC for No. 2 Southern pine, the grade common in treated lumber; the IRC tables are built on American Wood Council data, and the free AWC span calculator covers other species, grades and loads.
| Member | Size and spacing | Maximum span (No. 2 Southern pine) |
|---|---|---|
| Floor joists (40 psf live, 10 psf dead) | 2×6 at 16 in | 9 ft 4 in |
| Floor joists | 2×6 at 12 in | 10 ft 3 in |
| Floor joists | 2×8 at 16 in | 11 ft 10 in |
| Rafters (20 psf roof live, 10 psf dead, no ceiling) | 2×4 at 16 in | 9 ft 0 in, horizontal |
| Rafters | 2×4 at 24 in | 7 ft 4 in, horizontal |
| Rafters | 2×6 at 24 in | 11 ft 0 in, horizontal |
| Door header, bearing wall (12-ft building, 30 psf snow) | Two 2×4 / two 2×6 | 4 ft 0 in / 6 ft 0 in, one jack stud each end |
Sources: IRC Tables R502.3.1(2), R802.4.1(1) and R602.7(1). Rafter spans are measured horizontally from wall to ridge, so a 10-ft-wide gable shed has rafter spans of about 5 ft.
Two limits matter. The rafter figures assume a 20 psf roof live load with no snow; in snow country, use the IRC snow-load tables or the AWC calculator. The floor table assumes ordinary uniform loads, so a shed for a riding mower or heavy equipment deserves closer joists or a designer’s check.
How to build a storage shed, step by step
How to build a storage shed breaks down into ten steps. The sizes below assume a small gable-roof shed on skids; adjust them to your plan and your local code.
Step 1: Confirm the rules and mark the footprint
Get any zoning or building permit first, contact 811 if you will dig, then mark the corners with stakes and string. Measure the diagonals; when they match, the layout is square.
Step 2: Build the foundation
Level and compact the gravel pad or set the blocks, then lay ground-contact treated skids parallel to each other and check them with a long level in both directions. Every later step depends on this base being flat and level.
Step 3: Frame the floor
Cut two rim joists to the shed length and the floor joists to fit between them. Mark the rims at 16 in on center, nail through the rims into each joist end, and set the frame on the skids. Square it by matching the diagonals, then toenail or strap it to the skids.
Step 4: Sheathe the floor
Lay the subfloor panels with the long side across the joists and stagger the end joints. IRC Table R503.2.1.1(1) rates 19/32–5/8 in single-floor panels for joists at 16 in and 23/32–3/4 in panels for joists at 24 in. Glue and screw or nail them along every joist.
Step 5: Frame and raise the walls
Build each wall flat on the deck: bottom plate, top plate, studs at 16 or 24 in, and a header with jack studs where the door goes. Stand the walls, plumb them, nail the corners together, and add a second top plate that overlaps at the corners, as IRC R602.3.2 requires for stud walls.
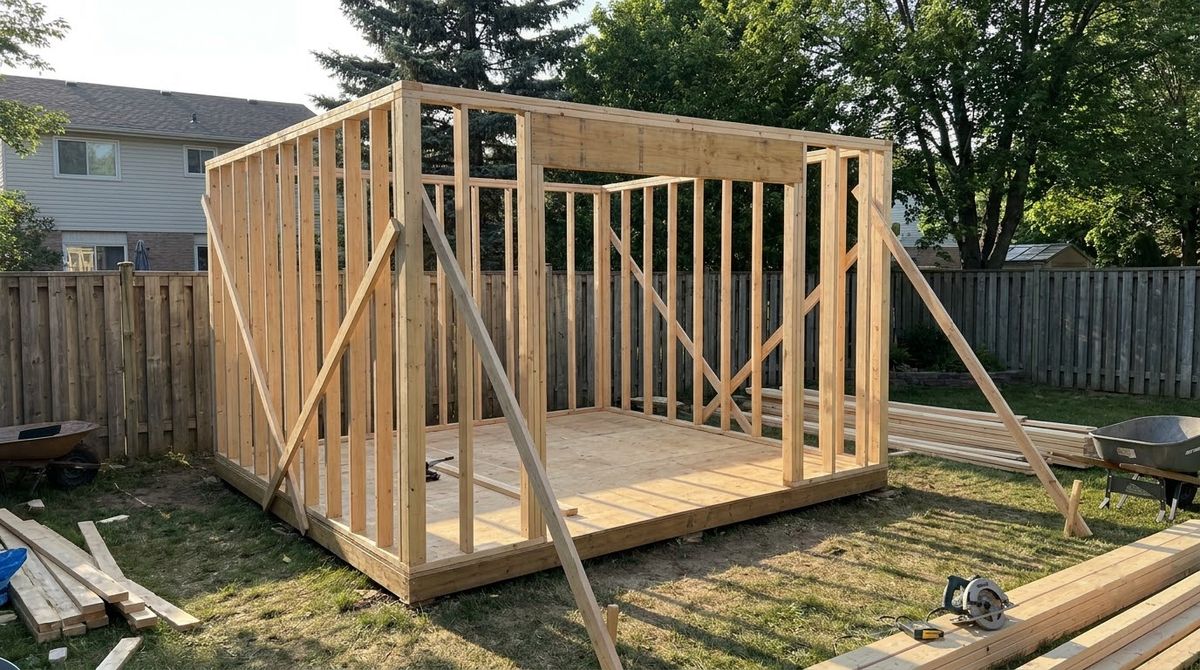
On a gable shed, the door often goes in the gable-end wall, which carries no roof load. IRC R602.7.4 allows a single flat 2×4 header in a nonbearing wall for openings up to 8 ft wide when the nailing surface above is no more than 24 in away.
Step 6: Frame the roof
Cut one pattern rafter with the ridge cut and the birdsmouth seat, test it, then use it to mark the rest. Set the ridge board, which the IRC says must be at least 1 in nominal and no shallower than the rafter’s cut end, and nail opposing rafters to it directly across from each other.
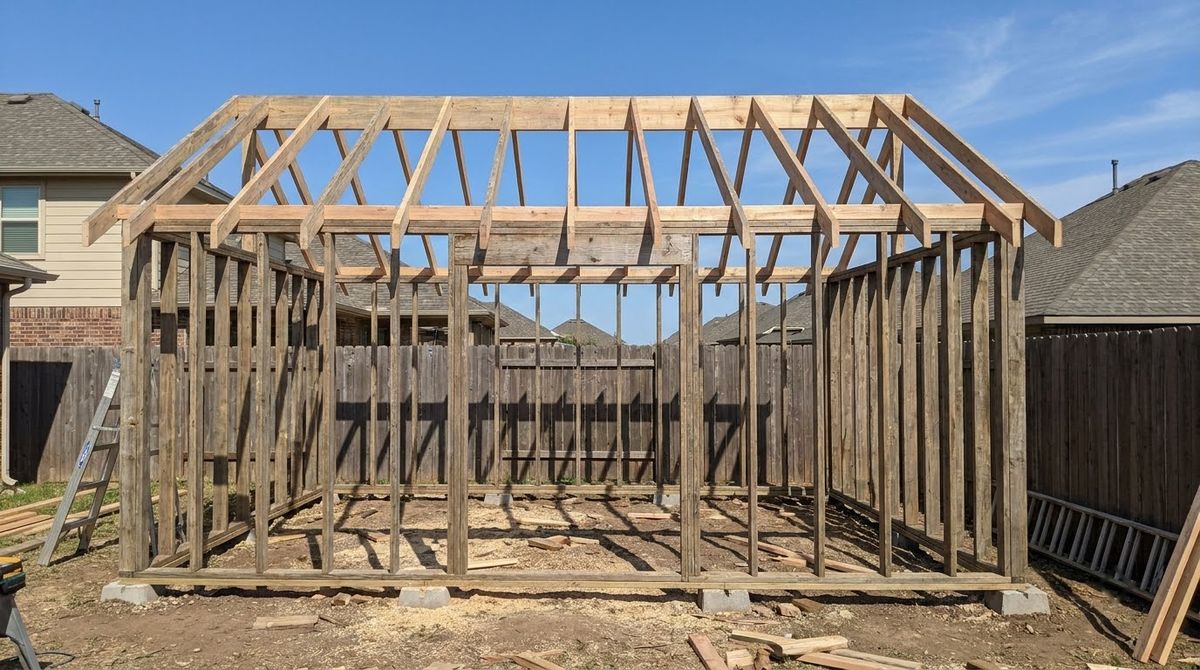
Tie each rafter pair across the shed in the lower third of the roof with 2×4 rafter ties at no more than 24 in on center (IRC R802.5.2), or the walls can spread under load. Collar ties in the upper third, at least 1×4 every 4 ft (R802.4.6), join rafters near the ridge but do not replace the low ties.
Step 7: Sheathe the walls and roof
Nail wall sheathing or structural panel siding to the studs, following the panel maker’s nailing schedule. On the roof, 7/16 in sheathing with a 24/16 span rating covers rafters up to 24 in on center.
Step 8: Roof it
Install metal drip edge at the eaves, roll out the underlayment over it, then add drip edge along the rakes over the underlayment, as IRC R905.2.8.5 describes. Shingle from the bottom up, with at least four nails per strip shingle (R905.2.6) long enough to go 3/4 in into the deck or through it.
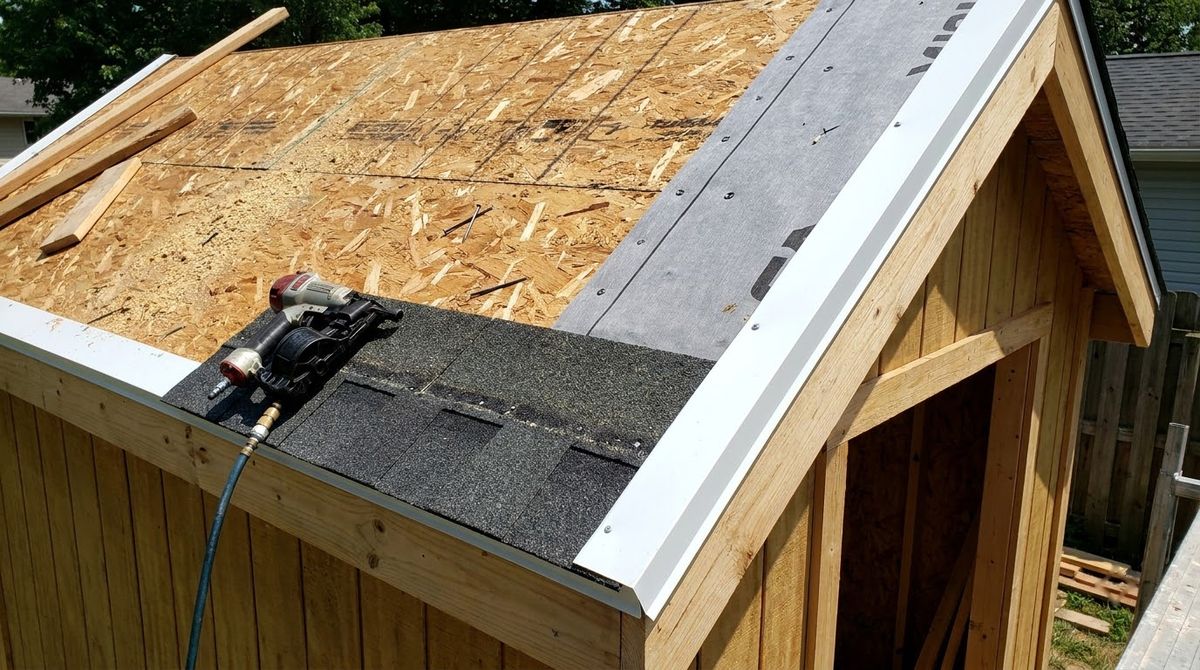
Keep the pitch at 2:12 or steeper for asphalt shingles. Between 2:12 and 4:12, the IRC calls for a double layer of underlayment.
Step 9: Build and hang the door
A shed door is usually built from siding or boards glued and screwed to a 2×4 or 1x frame with a diagonal brace that runs up from the hinge side, which keeps it from sagging. Hang it on heavy strap or T-hinges, leaving an even gap all around, and add a hasp or lock.
Step 10: Trim, paint and anchor
Add corner and fascia trim, caulk the joints, then prime and paint any untreated wood and siding. If your city requires anchoring, as Sioux Falls does, install the anchors before you load the shed with tools.
Shed-building mistakes to avoid
The shed-building mistakes to avoid are the ones that show up a year later as a sagging roof, a door that will not close or rot along the bottom. Watch for these:
- Skipping the zoning check. A permit-free shed in the wrong spot can still be ordered moved.
- Building on an unlevel base. Racked floors twist walls and jam the door.
- Using ordinary treated lumber in the ground. Skids and posts touching soil need a ground-contact rating.
- Leaving out rafter ties. Without them, rafters push the side walls outward and the ridge sags.
- Going too flat with shingles. Below 2:12, asphalt shingles leak; use a roofing made for low slopes.
- Oversizing the door without a header. In a bearing wall, the opening needs a sized header and jack studs.
Safety on a shed build
Safety on a shed build mostly means controlling saws, ladders and lifting. Wear eye and hearing protection with power saws and nailers, keep blade guards working, and support boards so cuts do not pinch the blade.
- Get help raising walls and setting the ridge; a wall can tip once it passes vertical.
- Brace raised walls with diagonal boards until the corners and top plates are nailed.
- Set ladders on firm, level ground and do not work from the top rungs or the roof edge.
- Wear gloves and a dust mask when cutting treated lumber and wash your hands before eating.
Frequently asked questions
Do I need a permit to build a shed under 200 square feet?
Not under the model code. IRC R105.2 exempts one-story detached accessory structures up to 200 square feet from a building permit. Many cities change that line, though. Middletown, Rhode Island requires a permit above 64 square feet, and Sioux Falls, South Dakota requires one for any shed, so check with your local building department first.
What size lumber do I need for shed floor joists?
It depends on the span. Under IRC Table R502.3.1(2), No. 2 Southern pine 2×6 joists at 16 inches on center span up to 9 feet 4 inches, and 2x8s at 16 inches span up to 11 feet 10 inches. On skids, the span is the distance between skids, so 2x6s cover most small sheds.
Can I use 2×4 rafters on a shed roof?
Often, yes, on a small shed without heavy snow. The IRC rafter table allows No. 2 Southern pine 2x4s at 16 inches on center to span 9 feet horizontally with a 20 psf roof live load. A 10-foot-wide gable shed has spans near 5 feet. In snow country, size rafters with the snow-load tables instead.
What is the best foundation for a storage shed?
For most small sheds, a compacted gravel pad with pressure-treated skids drains well and is easy to level. Concrete blocks or piers help on a gentle slope, and a slab suits larger or permanent sheds or cities that require one. Any wood touching soil must be rated for ground contact under IRC R317.1.2.
What is the minimum roof pitch for a shingled shed?
Asphalt shingles need a slope of at least 2 inches of rise per 12 inches of run, per IRC R905.2.2. From 2:12 up to 4:12, the code requires a double layer of underlayment. Flatter lean-to roofs need a roofing material made for low slopes, such as metal panels or a membrane rated for that pitch.
Sources
- International Code Council, 2021 International Residential Code, Chapter 1: Scope and Administration (R105.2; framing figures from Chapters 3, 5, 6 and 9 of the same code) (2021).
- International Code Council, 2021 International Residential Code, Chapter 8: Roof-Ceiling Construction (2021).
- American Wood Council, Span Options Calculator for Wood Joists and Rafters (checked 2026).
- Town of Middletown, RI, Shed Permits (checked 2026).
- City of Southfield, MI, Residential Building and Zoning Permit Application Requirements for Sheds (2016).
- City of Sioux Falls, SD, Detached Garages and Sheds (checked 2026).