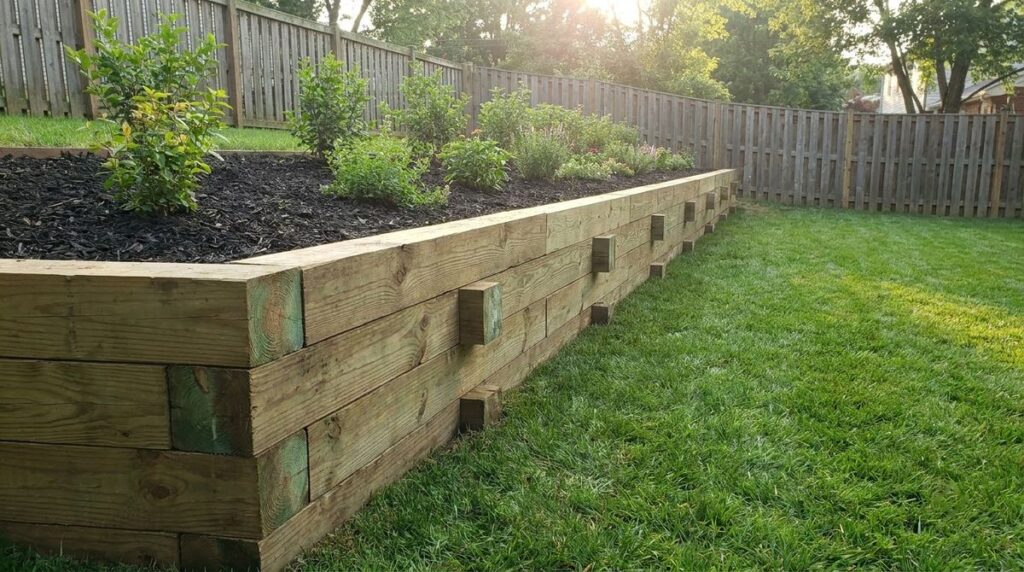
A treated lumber retaining wall is built from 6×6 timbers rated for ground contact, spiked course to course and tied into the hill with 6-foot deadmen every 8 feet, and it stays at or under 4 feet tall. That is the prescriptive timber detail Fairfax County, Virginia, publishes. Taller, tiered or loaded walls go to an engineer.
Key takeaways
- Buy ground-contact lumber. AWPA lists landscape walls at Use Category 4A or higher; Fairfax County specifies #2 or better southern pine treated to UC4A.
- Deadmen do the holding. Fairfax places 6-foot deadmen with a 30-inch cross plate at 8 feet on center, staggered between courses.
- Spike every joint. Two 60d hot-dipped galvanized or stainless spikes at each timber end, with joints offset at least 3 feet 6 inches course to course.
- The 4-foot line includes what you bury. The 2021 IRC permit exemption measures from the bottom of the footing to the top of the wall.
- Skip creosote railroad ties near food. EPA says creosote products are not sold to homeowners, and New Mexico State University Extension advises against growing vegetables near the ties.
Here is what a timber wall takes, with what to choose for each item.
| Item | What to choose | Notes |
|---|---|---|
| Wall timbers | 6×6 southern pine, #2 or better, treated for ground contact (UC4A or higher) | Read the end tag; UC3B above-ground lumber is the wrong product |
| Spikes | 60d or equivalent, hot-dipped galvanized or stainless steel | Pre-drilled, long enough to go at least 2 in into the timber below |
| Deadmen | 6-ft 6×6 with a 30-in 6×6 cross plate at the back | 8 ft on center, not in the top course or the buried bottom course |
| First-course pins | 1/2-in rebar, 4 ft long | Driven through 9/16-in holes about 2 ft apart (This Old House) |
| Base | 3/4-in crushed stone in a 6-in-deep compacted trench | Base details are covered in the footing guide linked below |
| Drainage | 4-in perforated pipe, filter fabric, crushed stone | Pipe runs the full length of the wall to daylight |
| Tools | Stakes and string, 6-ft and torpedo levels, circular saw, drill with 9/16-in spade bit, sledgehammer, hand tamper, wheelbarrow | This Old House rates the job hard and puts it at 16 to 24 hours |
Treated lumber retaining wall: which wood and which treatment
A treated lumber retaining wall lives in wet soil on one face and in sun on the other, so the treatment level matters more than the species. The American Wood Protection Association (AWPA) sorts treated wood into use categories, printed on the end tag or stamp of every piece.
- UC3B is above-ground exterior lumber. AWPA does not list it for landscape walls.
- UC4A is ground contact, general use. AWPA’s residential chart lists landscape walls, planter boxes and posts at “Use Category 4A or higher.” Fairfax County’s detail calls for UC4A.
- UC4B is ground contact, heavy duty, the category AWPA assigns to permanent wood foundations. It is a step up from the minimum; the Fairfax detail does not require it.
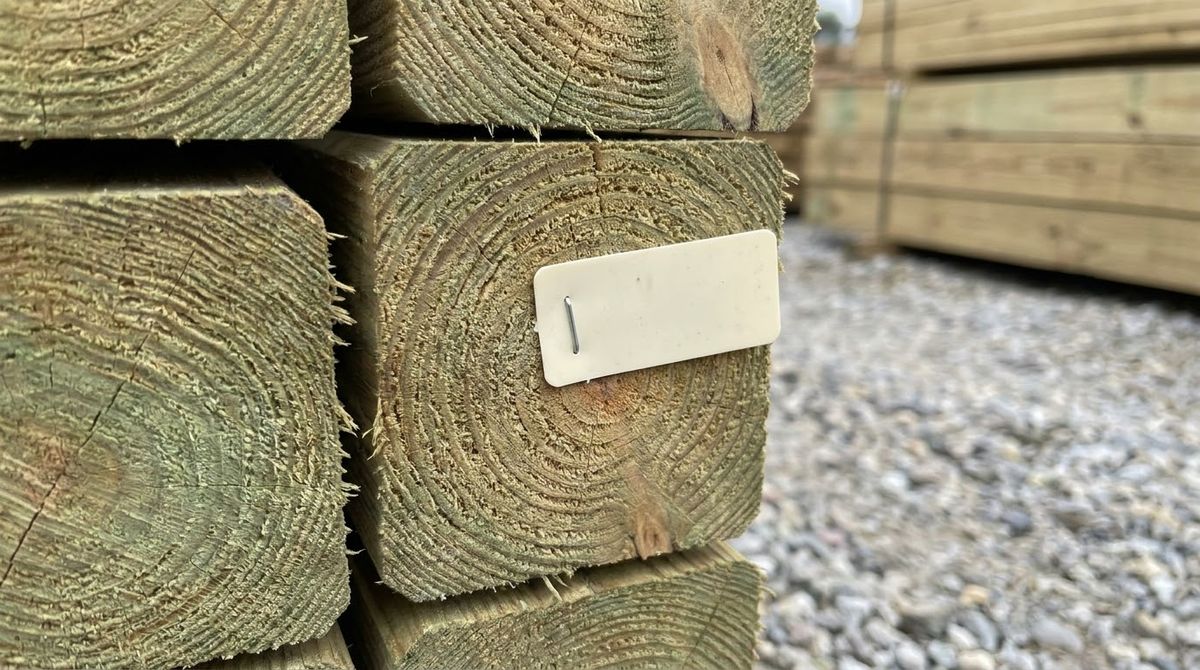
AWPA adds that some uses may need more preservative than the chart suggests, and leaves the final call to the designer.
Fresh cuts expose untreated wood, so This Old House brushes wood preservative on every cut end. Wood still has the shortest service life of the common wall materials; the lifespan ranges are in the retaining wall cost breakdown by material.
Height limits and permits for a wood retaining wall
Height limits for a wood retaining wall come from the building code and from the local detail you build to. Cities and counties can amend both, so check with your local building department before you dig.
- IRC R105.2. The 2021 International Residential Code exempts retaining walls “not over 4 feet in height measured from the bottom of the footing to the top of the wall, unless supporting a surcharge.”
- IRC R404.4. Walls not braced at the top that retain more than 48 inches of unbalanced fill, or walls over 24 inches that resist loads beyond soil, must be engineered, with a 1.5 safety factor against sliding and overturning.
- Fairfax County detail. It covers only residential, non-tiered walls with level backfill and no surcharge that retain no more than 4 feet of earth.
Count the buried timber. A wall with one course below grade and a gravel base under it reaches the 4-foot code line before the visible face does.
Deadmen and tiebacks: how a timber wall holds the hill
Deadmen and tiebacks turn a stack of timbers into a wall. A deadman is a timber that runs from the wall face back into the hill, with a short cross piece at its far end buried in undisturbed soil. The soil on top of it pins it down, so the wall cannot tip forward without dragging the anchor out.
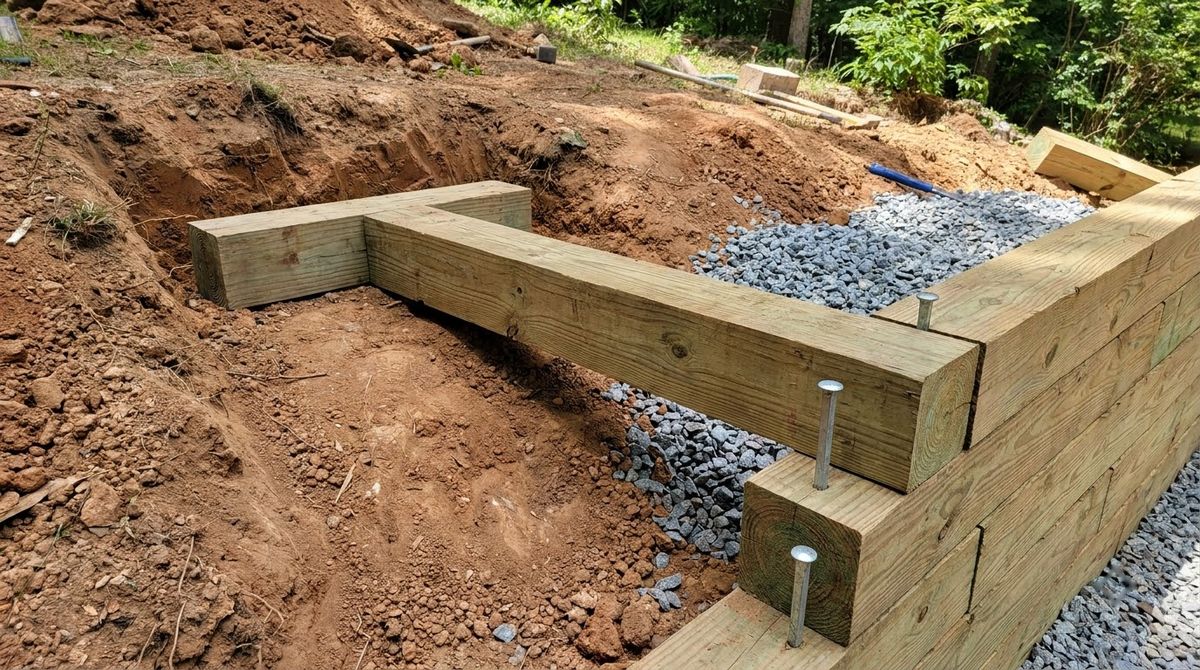
Fairfax County’s detail sets the layout:
- Size: a 6-foot 6×6 deadman with a 30-inch 6×6 cross plate, spiked with two 60d spikes at each end.
- Spacing: 8 feet on center along the wall, staggered between courses so they do not line up vertically.
- Where they skip: no deadmen in the top course or in the bottom course below grade.
This Old House’s method starts deadmen after the third course, spaces them every 6 to 8 feet, and drives two rebar stakes through each one into the hillside. It sets each deadman flush with the wall face and screws it to the wall with two landscaping screws.
How to build a treated lumber retaining wall, step by step
How to build a treated lumber retaining wall comes down to nine steps. The sequence follows This Old House’s timber wall guide, with fastener, deadman and drainage specs from the Fairfax County detail; where your local detail differs, follow it.
Step 1: Check the height rule and call 811
Settle the wall height and length, then confirm with your building department whether it needs a permit. Call 811 before digging so utilities mark their lines. Hand-dig near any flagged line.
Step 2: Mark the line and dig the trench
Mark the wall face with wooden stakes and nylon string, and stretch a level line to set the top of the first course. Dig a trench about 6 inches deep, then compact the bottom with a hand tamper. On a slope, step the trench in level sections, as in the stepped base for a wall on a slope.
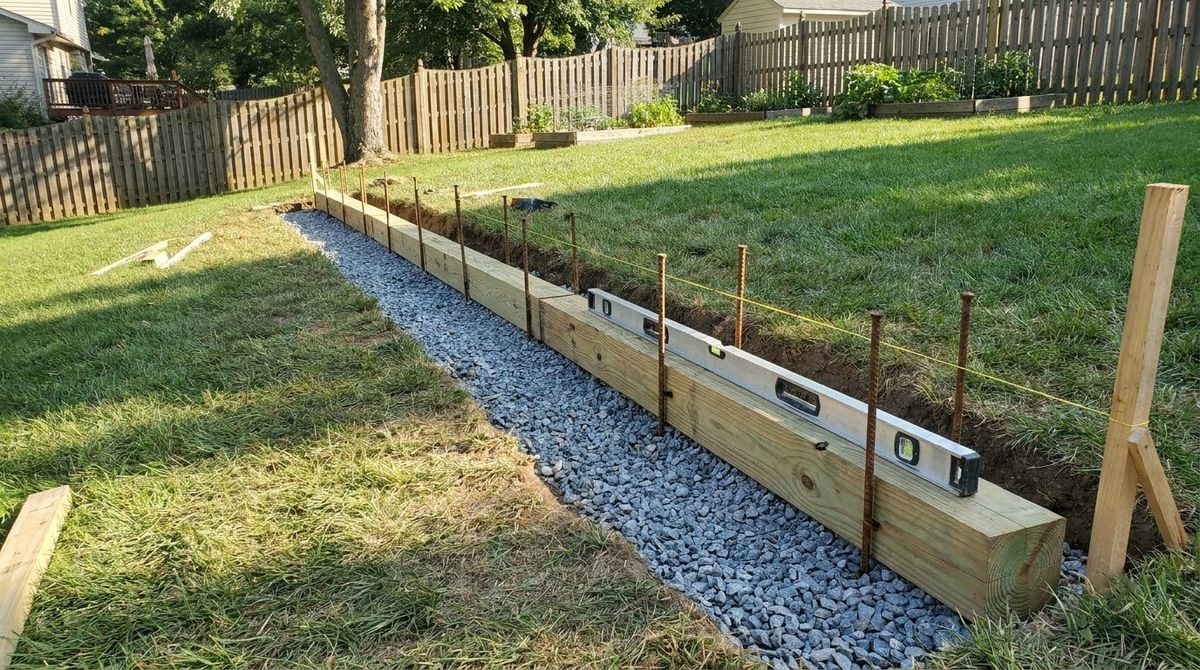
Step 3: Add and compact the stone base
Spread 3/4-inch crushed stone in the trench and compact it level. The stone gives the bottom timber a firm, free-draining bed. For base thickness and trench depth on softer soils, see retaining wall footing and base gravel.
Step 4: Set and pin the first course
Drill 9/16-inch holes about 2 feet apart through the first-course timbers. Set each timber in the trench, check it with a 6-foot level and a torpedo level, then drive 4-foot lengths of 1/2-inch rebar through the holes into the ground with a sledgehammer. The bottom course ends up below grade.
Step 5: Cut timbers and treat the ends
Cut timbers to length with a circular saw and coat every fresh cut with wood preservative. Plan cuts so joints in one course fall well away from joints in the course below; This Old House likes long timbers whose middles span the seams underneath.
Step 6: Stack and spike each course
Lay each course on the one below with end joints offset at least 3 feet 6 inches (Fairfax) or 4 feet (This Old House). Pre-drill, then drive two 60d spikes vertically at each timber end and more spikes at 24 inches on center along the course, staggered. Spike corners horizontally with two 60d spikes.
Step 7: Install the deadmen
At each deadman course, dig T-shaped trenches into the hillside, set the deadman flush with the wall face, and fasten its cross plate at the back with two 60d spikes at each end. Space them 8 feet on center and offset them from the deadmen in the course below.
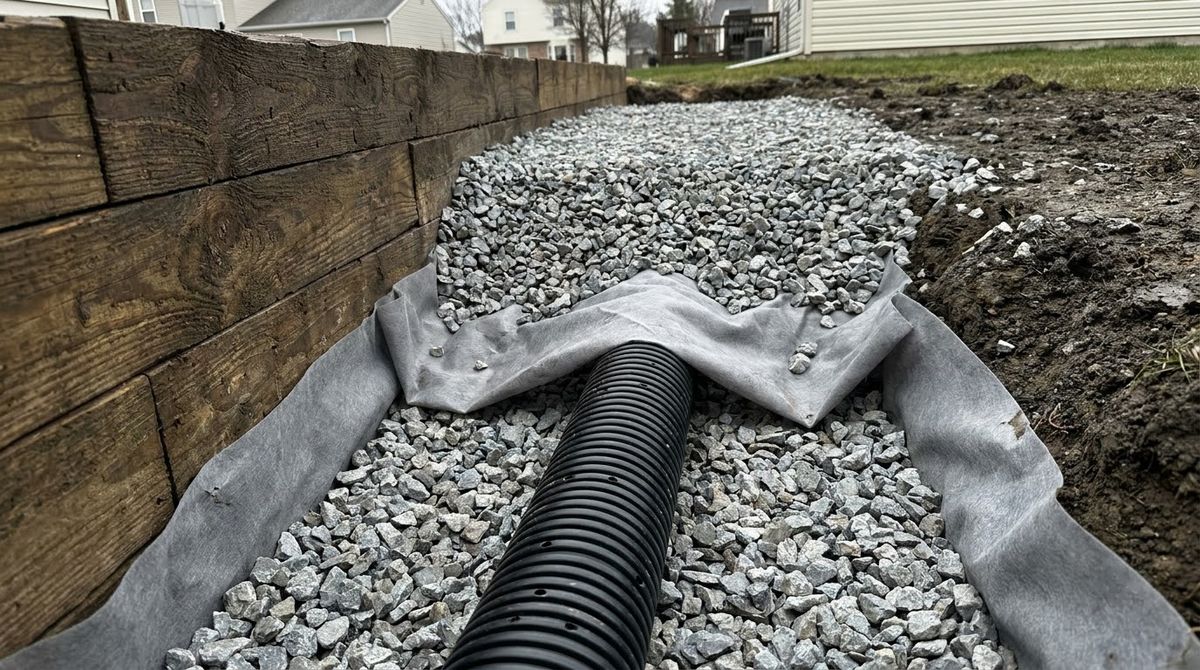
Step 8: Drain and backfill as you go
Lay the perforated pipe at the base behind the wall, wrap the gravel in filter fabric, and backfill in layers as the wall rises, compacting each layer so it does not settle. Fairfax keeps heavy equipment back from the wall by a distance equal to the wall’s height.
Step 9: Top out and finish the grade
Fasten the top course, stop the crushed stone 12 inches below the top of the wall, and finish with soil. Grade the ground in front so water runs away from the wall; This Old House spreads 2 to 4 inches of bark mulch at the base.
Drainage behind a timber retaining wall
Drainage behind a timber retaining wall does two jobs: it takes water pressure off the wall and keeps the buried timbers from sitting wet. Fairfax County’s timber detail draws it like this:
- Pipe: 4-inch diameter perforated drain pipe, full length of the wall, outlet to daylight.
- Gravel zone: filter fabric wrapped around a 12-by-24-inch body of gravel at the pipe.
- Backfill: crushed stone to within 12 inches of the top of the wall.
- Backfill shape: level backfill only; a slope behind the wall is outside the detail.
This Old House sets the pipe on stone and slopes it toward the front of the wall, then folds the fabric over to keep soil fines out of the stone. Pipe positions, outlets and fabric choices are covered in retaining wall drainage with gravel and pipe.
Railroad tie retaining walls: why creosote ties are discouraged near gardens
Railroad tie retaining walls go up the same way as timber walls, but used ties are usually treated with creosote, a wood preservative that EPA regulates as a pesticide. That changes where they belong.
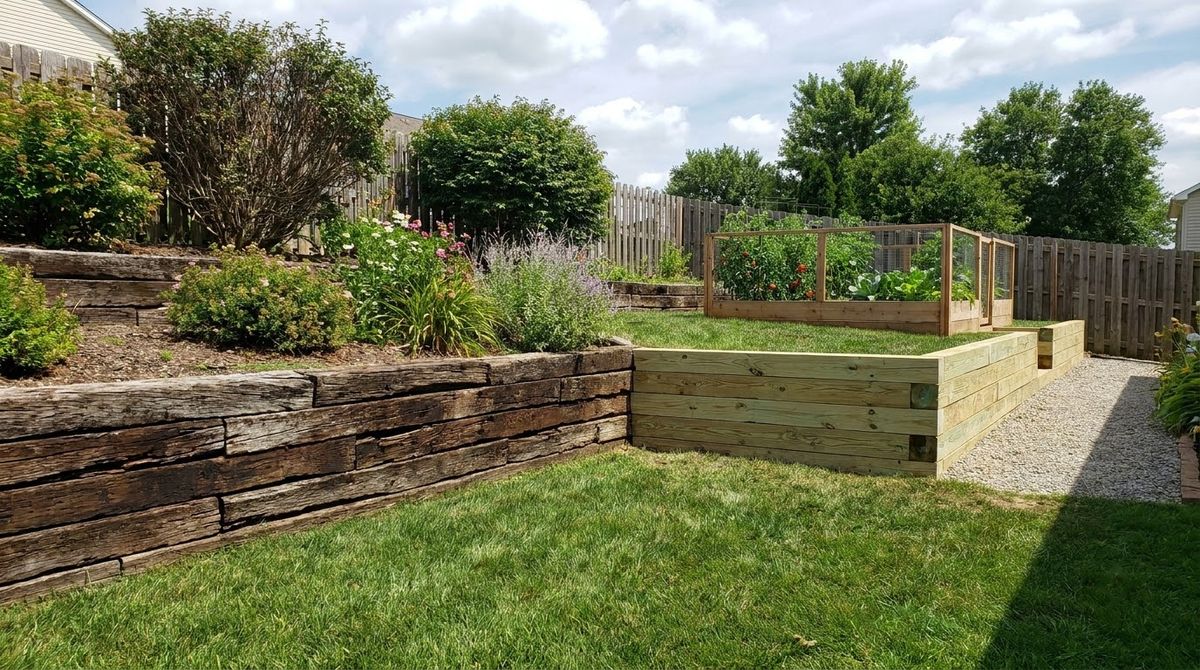
- Not a homeowner product. EPA says “creosote pesticide products are not available to homeowners,” though ties are sometimes recycled as landscaping timbers.
- Not an intended use. New Mexico State University Extension quotes EPA: “There are no approved uses of creosote to treat wood for residential use,” and residential landscape uses “are not intended uses.”
- Keep food away. The same NMSU column says “vegetables should not be grown in areas near the railroad ties.”
- Never burn offcuts. EPA: do not burn creosote or other preservative-treated wood in a residential setting.
EPA also says reuse of creosote-treated wood is not regulated under pesticide laws, and it did not find risks of concern for the general public.
The practical answer: build new walls from UC4A or higher timbers, and keep vegetable beds well away from any old ties you leave in place. For other low-cost materials, see these retaining wall ideas by material and budget.
Common mistakes with wood retaining walls
Most wood retaining walls that fail early trace back to a few shortcuts:
- Above-ground lumber. UC3B wood in soil is outside AWPA’s chart for landscape walls.
- Untreated cut ends, which expose wood the preservative never reached.
- Joints stacked in line, instead of offset at least 3 feet 6 inches course to course.
- No deadmen, leaving the wall to hold the hill with spikes alone.
- Bright or plated nails. Fairfax specifies hot-dipped galvanized or stainless spikes in pre-drilled holes.
- Soil backfill and no outlet, so water builds up behind the timbers.
- Building past the detail: taller than 4 feet, tiered, or with a slope, driveway or patio above it.
Safety and when to hire a pro
Safety on a timber wall starts with the 811 marks and ends with heavy lifting. Wet 6×6 timbers are awkward for one person, so carry and set long pieces with a helper, and wear gloves, safety glasses and hearing protection when you cut or drive spikes. Sweep up sawdust and never burn treated scraps.
Hire a wall contractor or engineer when the wall would top 4 feet from the bottom of its base, steps up in tiers, holds up a driveway, patio or structure, or sits below a slope. Wet or soft soil is another reason to bring in a designer.
Frequently asked questions
What grade of treated lumber should I use for a retaining wall?
Use lumber treated for ground contact. AWPA lists landscape walls at Use Category 4A or higher, and Fairfax County specifies 6×6 southern pine, #2 or better, treated to UC4A. Heavy-duty UC4B, the category AWPA gives permanent wood foundations, is a step up that the Fairfax detail does not require. Check the end tag before you buy.
How far apart should deadmen be in a timber retaining wall?
Fairfax County’s prescriptive detail places deadmen 8 feet on center, staggered between courses, with none in the top course or the buried bottom course. Each deadman is a 6-foot 6×6 with a 30-inch cross plate. This Old House spaces them every 6 to 8 feet, starting after the third course, and pins each one with rebar.
How tall can a wood retaining wall be without an engineer?
Plan on 4 feet or less. The 2021 IRC exempts walls up to 4 feet measured from the bottom of the footing, unless they support a surcharge, and Fairfax County’s timber detail covers walls retaining no more than 4 feet of earth with level backfill. Local codes can be stricter, so check with your local building department.
Can you use railroad ties for a retaining wall?
You can stack them like timbers, but most used ties carry creosote. EPA says creosote products are not available to homeowners, and NMSU Extension quotes EPA that there are no approved residential uses for creosote-treated wood. NMSU advises against growing vegetables near the ties. New UC4A or higher 6×6 timbers are the safer choice around gardens.
Does a wood retaining wall need drainage?
Yes. Fairfax County’s timber detail calls for a 4-inch perforated pipe along the full length of the wall, outlet to daylight, with filter fabric around the gravel and crushed stone backfill to within 12 inches of the top. Drainage relieves water pressure and keeps the buried timbers from sitting wet.
Sources
- Fairfax County, Virginia, Typical Retaining Wall Details, based on the 2021 Virginia Residential Code (version 7/05/2024).
- American Wood Protection Association, Select the Right Preserved Wood for Your Project: AWPA Use Categories (2021).
- International Code Council, 2021 IRC Chapter 1, Section R105.2 Work exempt from permit (Section R404.4 in Chapter 4).
- U.S. Environmental Protection Agency, Creosote (last updated December 22, 2025).
- New Mexico State University Extension, Southwest Yard & Garden: EPA says there is no approved use for creosote in residential settings (March 12, 2011).
- This Old House, How To Build a Wood Retaining Wall (updated May 22, 2026).